

How to make a kickass bio for your GitHub profile using DailyDev's Devcard and metrics.

I am Nandan, And you probably know me as a "Software Engineer who "hacked" an Airline to retrieve his luggage".
I am a full-time Software Engineer, Tech Speaker, and mentor. I enjoy talking about Web Development, Machine Learning, Natural language Processing, Machine learning Accelerated Mobile Pages, Progressive Web Apps, Cybersecurity, Chatbots, etc.
My claim to fame was when I posted a series of tweets on Twitter about data privacy issues on an airline’s website and the tweet got viral for all the good reasons. The story was covered by all major media portals all around the world including BBC, Saudi Gazette, Times of India, Boing Boing, Lallantop etc. and I have been interviewed by some major radio channels and podcasts.
In my free time, I like to indulge myself in activities like Photography, Gardening, Snooker, or Boxing. I am a proud owner of many plants, I sometimes talk to them (mostly pep talks).
The greatest trick the Devil ever pulled was convincing the world that procrastination isn't real. Trust me, it is quite real. I have thought of writing for two weeks now and finally, here I am at the third line of the blog.
But the past two weeks were not completely wasted, I updated a tic-tac-toe game that I had built a while back and it's now live here. It's built on react and is a Progressive Web Application.
I also took some time and updated my GitHub bio and this blog is going to be exactly about how I achieved that.
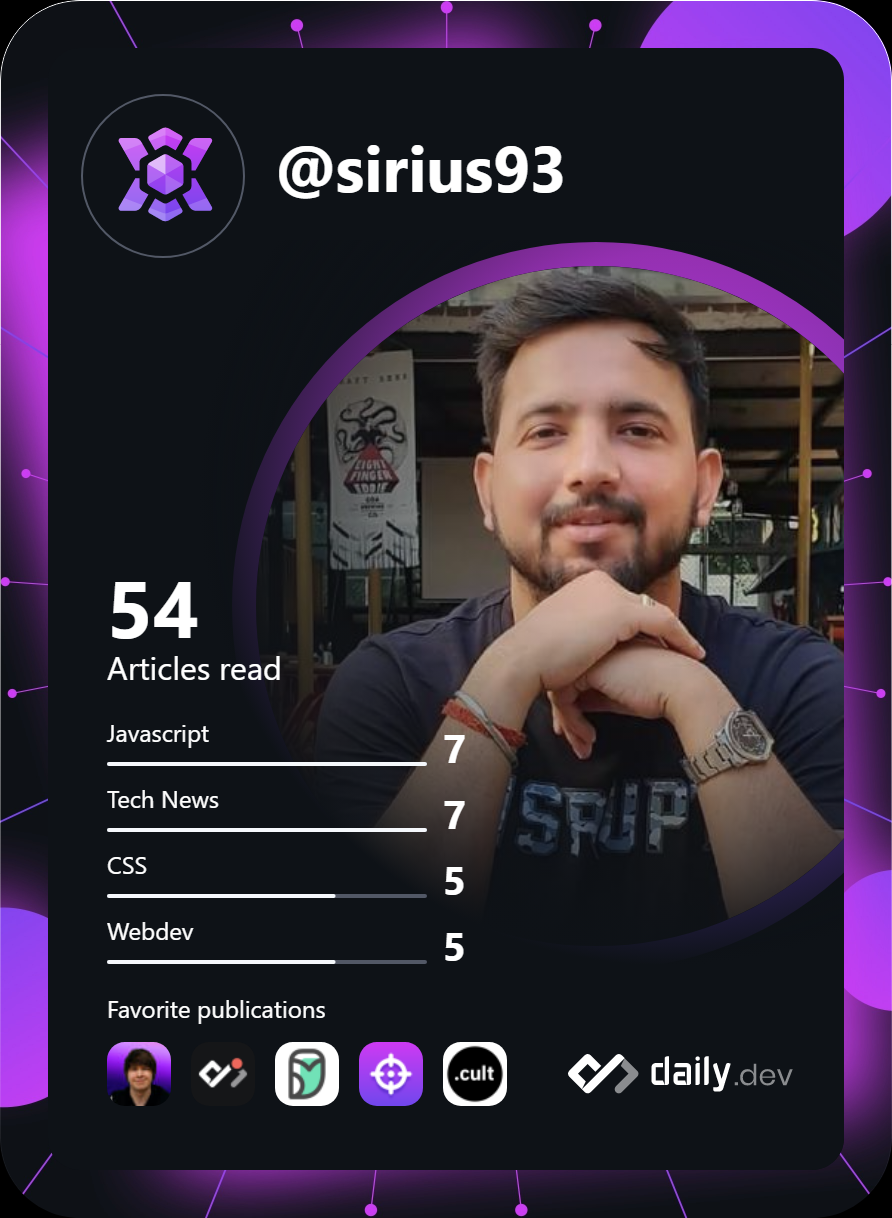
Last week, I signed up for daily dev and I love how they keep track of how many tech blogs you have read and give you a dev score based on that. Not just that, they generate a very cool personalized card for you, it's called DevCard and looks something like the picture below. How cool is that?
The best part is, You can add a GitHub action to update it periodically i.e. daily/weekly, etc.
The second part is Metrics that you can generate for your GitHub profile and append wherever you want. You can use Metrics by lowlighter for this.
I am going to provide a step-by-step guide for you to build your own custom bio. I will cover the basics, and you can expand it by adding more metrics supported by Lowlighter Metrics.
Let's get started..!!
The first thing you will need is to create a new Github repository with the same name as your GitHub username, i.e. my GitHub repository is named sirius93.
Next, you will need to initiate a readme.md file in your newly created repository.
The markup for your readme file should look like this:
# Hi there 👋
<div align="left">
<a href="https://twitter.com/<Your twitter username>">
<img
src="https://img.shields.io/twitter/follow/<Your twitter username>?label=Twitter&logo=twitter&style=flat-square&color=1da1f2&logoColor=ffffff"
alt="Twitter"
/>
</a>
<a href="https://www.linkedin.com/in/<Your linkedin username>/">
<img
src="https://img.shields.io/static/v1?logo=linkedin&style=flat-square&color=0072b1&label=LinkedIn&message=%E2%98%86"
alt="LinkedIn"
/>
</a>
<a href="https://api.daily.dev/get?r=<Your dailydev username>" target="_blank">
<img
width="256"
align="right"
src="https://github.com/<Your github username>/<Your github username>/blob/main/devcard.svg"
/>
</a>
</div>
## I am Nandan Kumar
You can add a small description about yourself.


Now that you have generated your devcard, and added the above code to the readme.md file of your special repository. It's time we get things working.
Let's try to add some automation by adding actions to your repository. Go to the Actions tab of your repository and click create a new workflow and then click set up a workflow yourself This will prompt you to create a .yml file, inside ".github/workflows/" folder. Please create two files with the names as below:
daily-devcard.yml
name: daily-devcard

on:
  workflow_dispatch:
  push:
    branches:
      - main
  schedule:
    - cron: "0 0 * * *"

jobs:
  devcard:
    runs-on: ubuntu-latest
    permissions:
      contents: write
    steps:
      - name: devcard
        uses: dailydotdev/action-devcard@2.0.6
        with:
          devcard_id: ${{ secrets.DEVCARD_ID }}
          commit_branch: main
          commit_message: "chore: update ${filename}"
- daily-metrics.yaml
name: daily-metrics

on:
  workflow_dispatch:
  push: {branches: ["master", "main"]}
  schedule: [{cron: "0 0 * * *"}]

jobs:
  stats:
    runs-on: ubuntu-latest
    steps:
      - uses: lowlighter/metrics@latest
        with:
          # You'll need to setup a personal token in your secrets.
          token: ${{ secrets.METRICS_TOKEN }}
          # GITHUB_TOKEN is a special auto-generated token used for commits
          committer_token: ${{ secrets.GITHUB_TOKEN }}
          committer_branch: github-metrics
          committer_message: "build: update `${filename}`"

          # Options
          user: <Your github username>
          template: classic
          base: header, activity, community
          config_timezone: Europe/Oslo

  notable:
    runs-on: ubuntu-latest
    steps:
      - uses: lowlighter/metrics@latest
        with:
          # You'll need to setup a personal token in your secrets.
          token: ${{ secrets.METRICS_TOKEN }}
          # GITHUB_TOKEN is a special auto-generated token used for commits
          committer_token: ${{ secrets.GITHUB_TOKEN }}
          committer_branch: github-metrics
          committer_message: "build: update `${filename}`"

          # Options
          user: <Your github username>
          template: classic
          base: ""
          config_display: large
          config_timezone: Europe/Oslo
          config_output: svg
          filename: notable.svg

          # Notable contributions
          plugin_notable: yes
          plugin_notable_filter: stars:>25

  language:
    runs-on: ubuntu-latest
    steps:
      - uses: lowlighter/metrics@latest
        with:
          # You'll need to setup a personal token in your secrets.
          token: ${{ secrets.METRICS_TOKEN }}
          # GITHUB_TOKEN is a special auto-generated token used for commits
          committer_token: ${{ secrets.GITHUB_TOKEN }}
          committer_branch: github-metrics
          committer_message: "build: update `${filename}`"

          # Options
          user: <Your github username>
          template: classic
          base: ""
          config_display: large
          config_timezone: Europe/Oslo
          config_output: svg
          filename: language.svg

          # Language plugin
          plugin_languages: yes
          plugin_languages_details: bytes-size, percentage

  achievements:
    runs-on: ubuntu-latest
    steps:
      - uses: lowlighter/metrics@latest
        with:
          # You'll need to setup a personal token in your secrets.
          token: ${{ secrets.METRICS_TOKEN }}
          # GITHUB_TOKEN is a special auto-generated token used for commits
          committer_token: ${{ secrets.GITHUB_TOKEN }}
          committer_branch: github-metrics
          committer_message: "build: update `${filename}`"

          # Options
          user: <Your github username>
          template: classic
          base: ""
          config_display: large
          config_timezone: Europe/Oslo
          config_output: svg
          filename: achievements.svg
          repositories_batch: 5

          # Achievement plugin
          plugin_achievements: yes
          plugin_achievements_threshold: C
          plugin_achievements_secrets: yes
          plugin_achievements_display: compact
- Add a dependbot.yml file inside your .github folder to run an actions job on a daily basis.
version: 2
updates:
  # Maintain dependencies for GitHub Actions
  - package-ecosystem: github-actions
    directory: /
    schedule:
      interval: daily
Once you add all these files and updated the placeholder fields, you have only couple of more things to do.
Add the access tokens for your actions. Goto Settings --> Security --> Secrets tab of your GitHub repository and add two secret codes in your actions and dependbot.
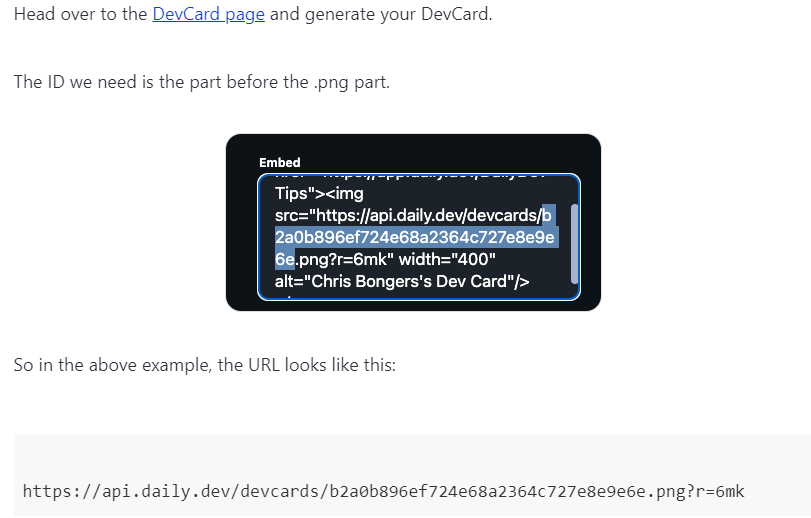
DEVCARD_ID : A unique id with which your devcard png file is generated. It should look something like this :
METRICS_TOKEN : A unique key, generated by you for your github profile, This key can be generated from the setting window of your GitHub profile, from which you can generate a personal access token. This key provides third-party library access to your GitHub repository. Make sure to provide only necessary permissions.
Manually run both the GitHub actions to generate the SVG files for the first time. The dependbot will take care of any subsequent runs and will take care of the content generation based on the time interval provided by you.
Once you follow these steps, you should be able to add a bio that will update based on your everyday activity on GitHub and daily dev.
If you come across any issues and need any kind of assistance, drop a comment below or shoot me a mail at connect@nandan.dev and I will try to help you out.
Stay tuned & connect with me on my social media channels. Make sure to subscribe to my newsletter to get regular updates on my upcoming posts.
Twitter | Instagram | Github | Website
Footnotes: